| Frequently
given answers for Spectragryph |
Opening *.spc files doesn't work. There is a message saying
something about "gspciolib.dll error" or "Class
not registered"
Please follow the installation
instructions from the download site. To enable reading of
*.spc files, Spectragryph has to be installed with admin permissions!
|
Opening *.sif files from Andor doesn't work on my Win11 system.
The error message says "External Exception C06D007E"
Reading of *.sif files from Andor makes use of the atsifio.dll
conversion DLL. On Win11, a more recent version of this DLL is
required. Please download this zip
file and copy the contained dll files into the Spectragryph
program folder (admin permission needed). Say YES to overwriting
atsifio.dll and atspooler.dll. Restart Spectragryph
and it will work forever. |
The software doesn't start, instead giving an error about
"MSVCP100.dll is not a valid Windows image" (or something
else about "msvcp100.dll")
Please delete the "msvcp100.dll" file from the Spectragryph
program folder and try to start again.
If it is still not working, please download & install Microsoft's
"Microsoft Visual C++ 2010 Redistributable Package (x86)"
from
here. |
The software doesn't recognize my file format. What can I do?
For ASCII files (that is: content can be read with a text
editor), try to change your file extension to *.csv (for multi-spectrum
data) or else *.txt or *.fak (for single-spectrum data), and open
again with Spectragryph. There is a good chance to successfully
import your data. You might also try to copy the data columns
and use the "Paste data from clipboard" feature.
For binary files, first have a look for an export feature
within the measuring software. Most spectrometer software has
a feature to export data into ASCII files. You might also send
me sample files (ideally the same data as both binary and ASCII
file), often enough it is possible to create a new import function
for these files. |
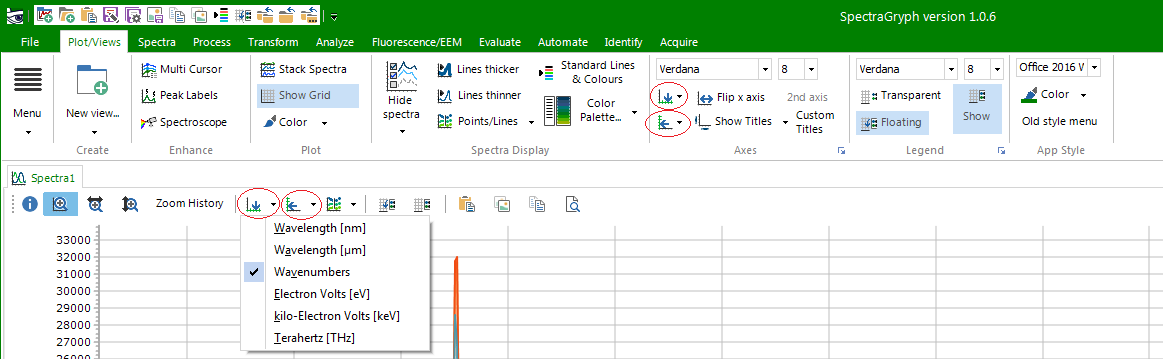
How can I change the axis types?
Just use one of the "Axes" buttons from the "Plot/
Views" ribbon for axis type selection (also available on
top of each spectra tab). All axis types can be used for all spectral
types, however not every axis type conversion also make sense
(e.g. to display an intensity spectrum as transmittance). Please
understand that only the plotted display is changed, the spectral
data itself remains unchanged.
 |
|
Where can I select the axis boundaries? How can I zoom in
and out?
Select the zoom region with the left mouse button. Axis ticks
will always be labeled with even numbers. Clicking the right
mouse button zooms back out again to give the full display.
Middle mouse button will pan the whole plot around. Mouse wheel
scrolls horizontally. Shift + mousewheel scrolls vertically.
Alt + mousewheel zooms in/out centered at the mouse position.
Selecting one of the "zoom direction" buttons on top
of the spectra page (or EEM page) will restrict zooming and
scrolling to the selected direction. Use the [Zoom history]
button for stepwise zooming out. The blue ( i ) button gives
an overview of all possibilities.

Additionally,
you can assign custom axis boundaries by 1) clicking onto the
respective axes and entering the start/ end values, and 2) turn
on/off the use of these boundaries with the [custom boundaries]
button from the Plot/Views ribbon. Whenever zooming out, these
boundaries will be used as axis range.
|
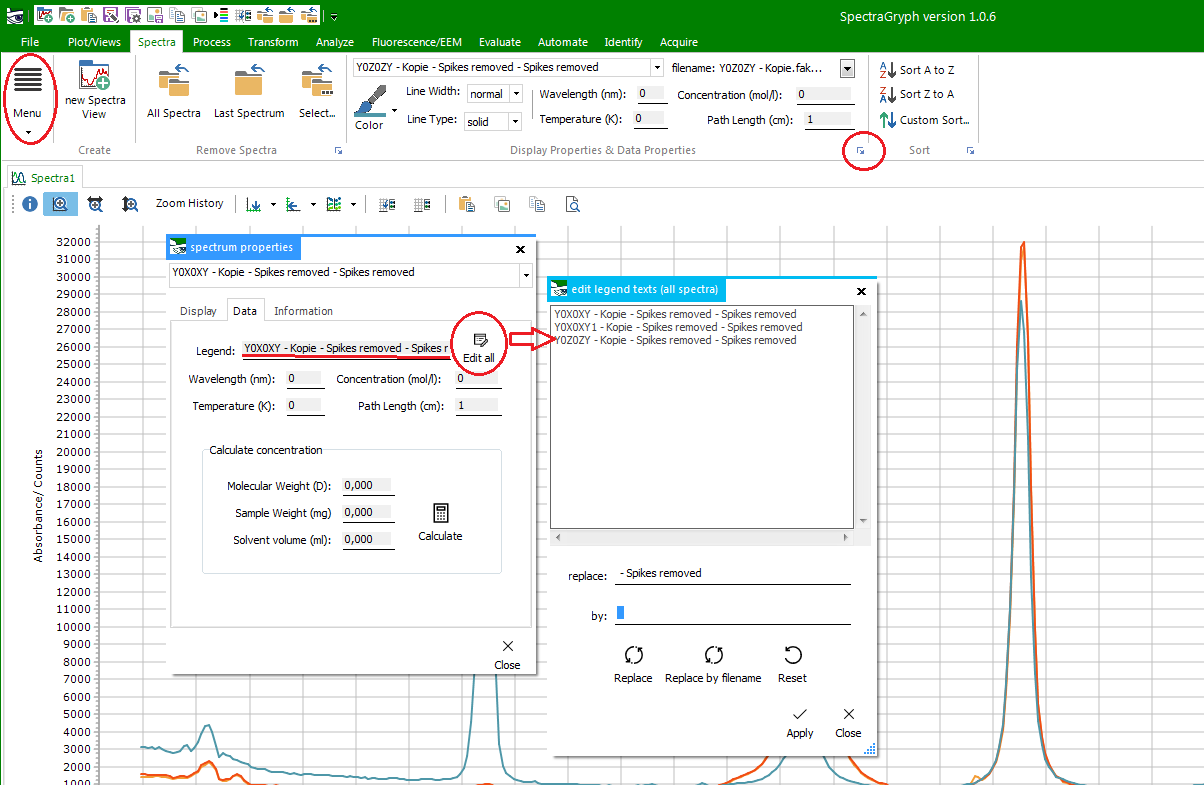
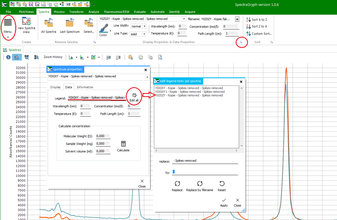
Can I edit the spectrum names/ legend texts?
Change legend texts for all spectra with the "Replace by
filename" option from the "Edit Legend text" function
(accessible with doubleclick on the legend box, or F6 shortkey,
or from the left menu on the "Spectra" ribbon or from
the lower right arrow menu in the Spectra ribbon's Properties
section... In the upper text box, insert your desired spectrum
description (= "legend text"). The "Edit all "
button brings up a sub-window, to allow to work on all spectra
legend texts, including batch search&replace functionality.
|
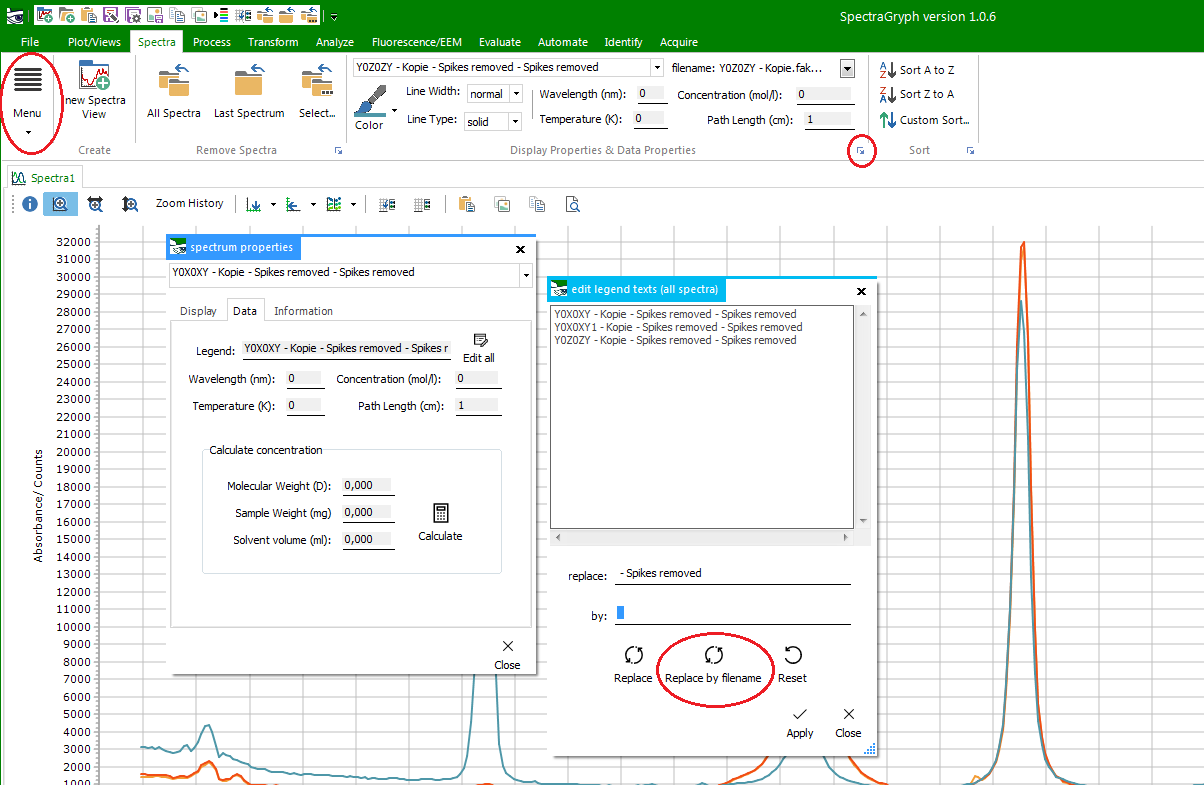
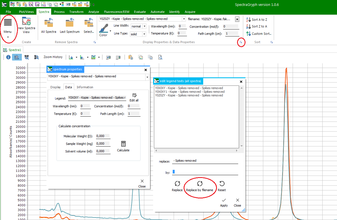
Is it possible to use the filename as legend text?
bring up the "Edit all" window for editing all legend
texts (by doubleclick on the legend box, or pressing F6, or from
the left menu on the "Spectra" ribbon or from the lower
right arrow menu in the Spectra ribbon's Properties section).
By using the "Replace by filename" button, you can immediately
replace all the legend texts by the spectra's filenames.
|
What is the best way for creating a spectral plot graphics?
Two things are essential:
1) Do not maximise the Spectragryph window! Instead keep it medium-sized.The
plot created by "Save Plot as..." or "Copy Plot
to Clipboard" has text and axis labeling that is sized proportional
to what you see on your screen. Which happens to look much better
for a medium sized Spectragryph window, compared to a maximised
one.
2) Use a line size of +1 or +2, by hitting "Lines Thicker"
once or twice. Like this, line colours can be seen much better,
especially in printouts.
To get an impression, have a look at this example
PDF document. |
How to normalize to any peak I want, even if it is not the
highest peak?
As the hint for the "Normalize (Peak)" button says,
it will set each spectrum's highest peak within the visible area
to 1. That is: first use the mouse to zoom into the peak area
you want to normalize and then press the "Normalize (Peak)"
button. Like this, you are not only able to normalize to any peak
you want, but you can in fact even apply normalization to any
spectrum position. Just zoom in a way, that the desired position
is the highest point in the current plot window, before executing
the "Normalize (Peak)" function. |
Can't connect to my Ocean Optics spectrometer. The message says
something about ""Class not registered"?
Make sure to quit OceanView/ SpectraSuite software before
controlling your spectrometer module from Spectragryph. In
case there is no OceanOptics software installed*,
it is required to first install the 32bit version of OceanOptic's
Omnidriver package. Please download from the OceanOptics
website, or else from this website: http://www.effemm2.de/spectragryph/support/OmniDriver-2.56-win32-installer.exe.
Beware, it is about 125MB in size. After installing this package,
Spectragryph should run smoothly with your OO module. One
more time: the 32bit version of OmniDriver is needed!
Supported device types are: ADC1000-USB, Apex, Curie, Flame, HR2000,
HR2000+, HR4000, Jaz, Maya2000, Maya2000Pro, MayaLSL, MMS-Raman,
NIR256, NIR512, NIRQuest, QE65000, QE65Pro, QEPro, Spark, STS,
Torus, USB2000, USB2000-FLG, USB2000+, USB4000, Ventana. Some
older types might not get immediately recognized: these require
manual driver association, then it works flawlessly.
About driver versions: the Spectragryph version v1.2.9 and newer
will work with OmniDriver versions v2.46 and v2.56, but not with
older OmniDriver versions. Spectragryph version v1.2.8 and older
worked only with OmniDriver version v.2.43.
*
Even with OceanView installed, it might still not work. The 32bit
driver package is required, as described above. |
Can't connect to my Andor camera. There is a message about "VxD
not loaded"?
Make sure to turn off Andor SOLIS software before connecting
your camera with Spectragryph. Sometimes, an instance of SOLIS
invisibly keeps running and prevents Spectragryph from successfully
connecting. In these cases, use TaskManager to really close down
the SOLIS software.
Supported camera types include at least: iDus, iVac, iXon, iStar,
Newton, iKon, but probably more |
|
Can't connect to my StellarNet spectrometer.
Make sure to quit SpectraWiz software before controlling
your spectrometer module from Spectragryph. It would automatically
connect to the Stellarnet module, preventing the ability to
connect from Spectragryph. Also, when already connected in Spectragryph,
the module won't connect at the same time with SpectraWiz.
In case there is no Stellarnet software installed, make
sure to first install at least the Stellarnet drivers (32bit
version!), as described on the Stellarnet
website.
For error messages saying something about USB or "Invalid
uHandle", just start Spectragryph once with admin permissions
and it should work properly afterwards.
Supported
device types include at least: GREEN-Wave, BLUE-Wave, BLACK-Comet,
SILVER-Nova, HYPER-Nova, DWARF-Star, RED-Wave, Raman models
|
Can't connect to my Avantes spectrometer.
Make sure to quit AvaSoft before controlling your spectrometer
module from Spectragryph. It would automatically connect to the
Avantes module, preventing the ability to connect from Spectragryph.
Also, when already connected in Spectragryph, the module won't
connect at the same time with AvaSoft.
In case there is no Avantes software installed, make sure
to first install at least the Avantes WinUSB drivers or the Avantes
AvaSoft software, as described on the Avantes
website. You may also just download the Avantes driver package
from my website: http://www.effemm2.de/spectragryph/support/dp_avaspec.exe
(size: 9.4MB)
In case it says "MSVCP120.DLL is missing", please install
the VC++ 2013 redistributable package (as 32bit version) from
the Microsoft
website first.
The software should work with all AvaSpec, AvaSpec-NIR, AvaSpec-HS
and AvaSpec-Mini devices. |
Can't connect to my Arcoptix spectrometer.
Make sure to quit ARCspectro software before attempting to
connect to your Arcoptix spectrometer. It would prevent the ability
to connect from Spectragryph, at least if it is connected to the
spectrometer module. Also, when already connected in Spectragryph,
the module probably won't connect at the same time with ARCspectro.
In case of no ARCspectro software installed, it is mandatory to
have the arcoptix drivers installed (for download from here: https://www.effemm2.de/spectragryph/support/Arcoptix_Drivers.zip).
In case it says something like "VCRUNTIME140_1.dll is missing"
please install the Visual C++ Redistributable 2015-2019 from here:
https://www.effemm2.de/spectragryph/support/vcredist_2015-2019_x64.exe
|
Can't connect to my Wasatch Photonics spectrometer.
Make sure to quit Enlighten software before connecting your
spectrometer module from Spectragryph. It would automatically
connect to the Wasatch module, such preventing the ability to
connect from Spectragryph. Also, when already connected in Spectragryph,
the module won't connect at the same time with Enlighten.
In case there is no Enlighten software installed, or if the
64bit software is installed, make sure to first install the 32bit
version of Wasatch Photonic's .NET driver package from here: http://wasatchphotonics.com/binaries/drivers/Wasatch.NET/
- Spectragryph v1.2.13 and newer needs Wasatch driver version
v2.0.27: https://www.effemm2.de/spectragryph/support/WasatchNET-2.0.27-Setup32.msi
- Spectragryph v1.2.11 and v1.2.12 work with driver v2.0.7:
https://wasatchphotonics.com/binaries/drivers/Wasatch.NET/archives/WasatchNET-2.0.7-Setup32.msi.gz
- Spectragryph v1.2.9 and v1.2.10 needed a driver from the v1.x
series. |
Will the software also control my XY spectrometer?
No way, if its manufacturer is not listed here.
For each new spectrometer type, it takes a considerable implementation
effort, as all manufacturers have their own, special way of "talking"
to their hardware. Therefore, controlling a previously unknown
device type will never work by chance. I will at least need some
kind of documentation (command set, interface DLL, ...) and such
a device on my desk for implementing and testing. |
|
Will
the licensed version work with an offline computer?
It will work well on an offline computer. Usually, online access
is required for the initial license activation step and re-verification
every 90 days. There is an easy online way and a slightly more
complicated offline way to do this.
1)
online activation: Just click onto the "Activation"
button during software startup and follow the instructions.
Have the license key ready for this. Later on, it will ask for
re-verification every 90 days, with a 14days grace period. For
re-verification you need to be online, but the software does
all the rest. All the time in between, no online interaction
will happen.
2)
offline activation: for the special case of a computer that
never goes online, there is also a solution for both initial
activation and re-verification. Just two more steps involved,
with sending a file back an forth. Again, click the "Activation"
button during software startup and follow the instructions for
offline activation.
|
|
![[SpectraGryph]](gryphon_white_green_96.png "back to SpectraGryph main page")